Showing posts with label worsted weight yarn. Show all posts

Tuesday, April 02, 2013

This is such a warm hat!

Baby's Baker Hat

Worsted wt Yarn (#4.  I used Red Heart Super Saver in blue variegated for the Boy's Hat and Impeccable for the girls hat--cuz those are the colors I had.  (Thank you to everyone who donates yarn to me so I can make hats for the homeless, hospitals and prayer shawls/lapghans!!!)
Size I Hook.

Size:  Newborn.  For a smaller size Preemie you could use a G hook;  For a toddler, you could use a K Hook.  Just guessing here as I have only made the newborn size.

Sts Used:    sc, hdc , dc,
Lazy Shell (sc in indicated chain, ch 3, 2 dc in same ch 3),
Modified Lazy Shell (sc in indicated chain, ch 3, 1 dc in same ch3),
Hdc ribbing (ch indicated number of stitches, hdc across row, ch 2, turn, hdc in BACK LOOP of each hdc of previous row.  Repeat until desired length),
Crab Stitch (sc backward to end of row and join in 1st sc).

Shrinking Rib (this is made after body of hat is finished.  It draws the top of the hat together and makes a neat pattern):  ch 6, turn, sl st in first 2 sts, sc in next 2 sts, hdc in last st.  Turn.  Working in Back Loops only for the rest of the SR:  sl st in next 3 sts on row below on body, turn work, hdc in 1st st (remember back loops only), sc in next 2 sts, sl st in last 2 sts.   *turn work, sl st in first 2 sts, sc in next 2 sts, hdc in next st.  sl st in next  3 sts on body of hat (this is to decrease so you can work 2 or 3 as you see the work sitting flat), turn work, hdc in hdc, sc in each of next 2 sc (again in back loops only), sl st in next 2 sl st. * until you have reached the beginning of the work. sl st last row and first row together,  Fasten off, weave in ends.   If you ended up in the center of the work, leave a long tail of yarn and sew the opening closed.  If you end up at the other end away from the circle, just cut yarn, take a long piece of yarn and a yarn needle and sew center closed.

Instructions:
Ribbing--
Row 1: Ch 10.  Hdc in 2nd ch from hook, hdc across chain.  8 hdc
Row 2:   TURN, Ch 2.  IN BACK LOOPS ONLY, hdc in each hdc across.  8 hdc.
Row 3-24: Repeat Row 2.
This piece when laid flat and not stretched measured 12".

Next:  Fold ends to meet (making a circle) and slip stitch the end rows together, turn piece so that seam is inside the hat and continue working on this piece.

This is the part that decides if it is a boy's or girl's hat--
For Girls:  (working a sc in the ridge part of the ribbing and 5 dc in the middle of each ridge section around.)  To clarify:  ch 1, sc in same st as last sl st.  sk end of this hdc row and place 5 dc (shell)  in end of next row.  *sc in end of ridge, 5 dc in end of next row* around.   Join in first sc.  (12 sc, 12 5-dc shells)  Fasten off and weave in ends.
PHOTO
For Boys:  You can either leave it plain and start working on the body of the hat from this very same position OR you can do a Crab Stitch (Backward Single Crochet) around the edges.  If you do the Crab Stitch, join at end of row, fasten off, weave in ends.

Body of Hat--
Attach yarn at opposite end of seam, ch 1, sc in same st as joining.

Row 1: ch 3, place 2 dc in the sc you just made, sk 1 st.  *sc in next st, ch 3, place 2 dc in the side of the sc you just made* (lazy shell made).  Work in this way around the side rows of the ribbing opposite the girl/boy edging of course.  Join in 1st sc.  (20 lazy shells)

Row 2: TURN WORK, ch 1, sc in base of joining, ch 3, 2 dc in side of sc just made.
Sc into ch 3 of previous row/next lazy shell.  ch 3, 2 dc under same ch 3 space.  (finished lazy shell).  *sc under ch 3 of next lazy shell on last row, ch 3, 2 dc under same ch 3 space* around.  Join with sl st in first sc.  (21 lazy shells)

Row 3: ch 1, TURN, sl st in 1st 2 dc and into ch 3 of previous lazy shell.  Ch 1, in ch 3 place a Lazy Shell (ch 1, sc, ch3, 2 dc all in next ch 3).  Repeat around.  (Piece will start looking incredibly large.  Not to worry)  Join with sl st in 1st sc.  (21 lazy shells)

Row 4: TURN, sl st in 1st 2 dc and into ch3 of previous lazy shell.  Ch 1, sc in same space, ONE (1) dc in ch 3.  *sc in next ch 3, ch 3, 1 dc in same ch 3 (Modified Lazy Shell).  Proceed to put a Modified Lazy Shell in each Lazy Shell around.  Join to beginning sc.
(21 Modified Lazy Shells).

Row 5: Ch 2, Place 2 hdc in each ch 3 around.  (42 hdc)  (Note:  I worked this row quite tight.)

INNER RIBBING:

Row 1: `ch 7, turn, working back on ch you just made,  sk first loop, sl st in next 2 ch, sc in next 2 ch, hdc in last ch.  Now comes the "interesting part--)  sk joining, sl st in next 2 hdc on last row worked.

Row 2: turn work so little "tail thingy" is on your left.  IN BACK LOOP ONLY, make a hdc in 1st hdc on tail,  sc in each of next 2 sc (again back loops only...you will be making a shrinking rib), sl st in next 2 sl sts.  (hard work but u can do it--I just pick up whatever I can get in the back loop and go on.   doesn't show)

Row 3: ch 1, sl st in bk lp only of 1st 2 sl sts, sc in bk lp of next 2 sc, hdc in hdc.
sl st in next 3 sts on body of hat....
Continue in this manner until you are at the beginning.  If you have a problem, consult the directions above for Shrinking Rib.  You can always email me for clarity.  Emmalemmon47@yahoo.com
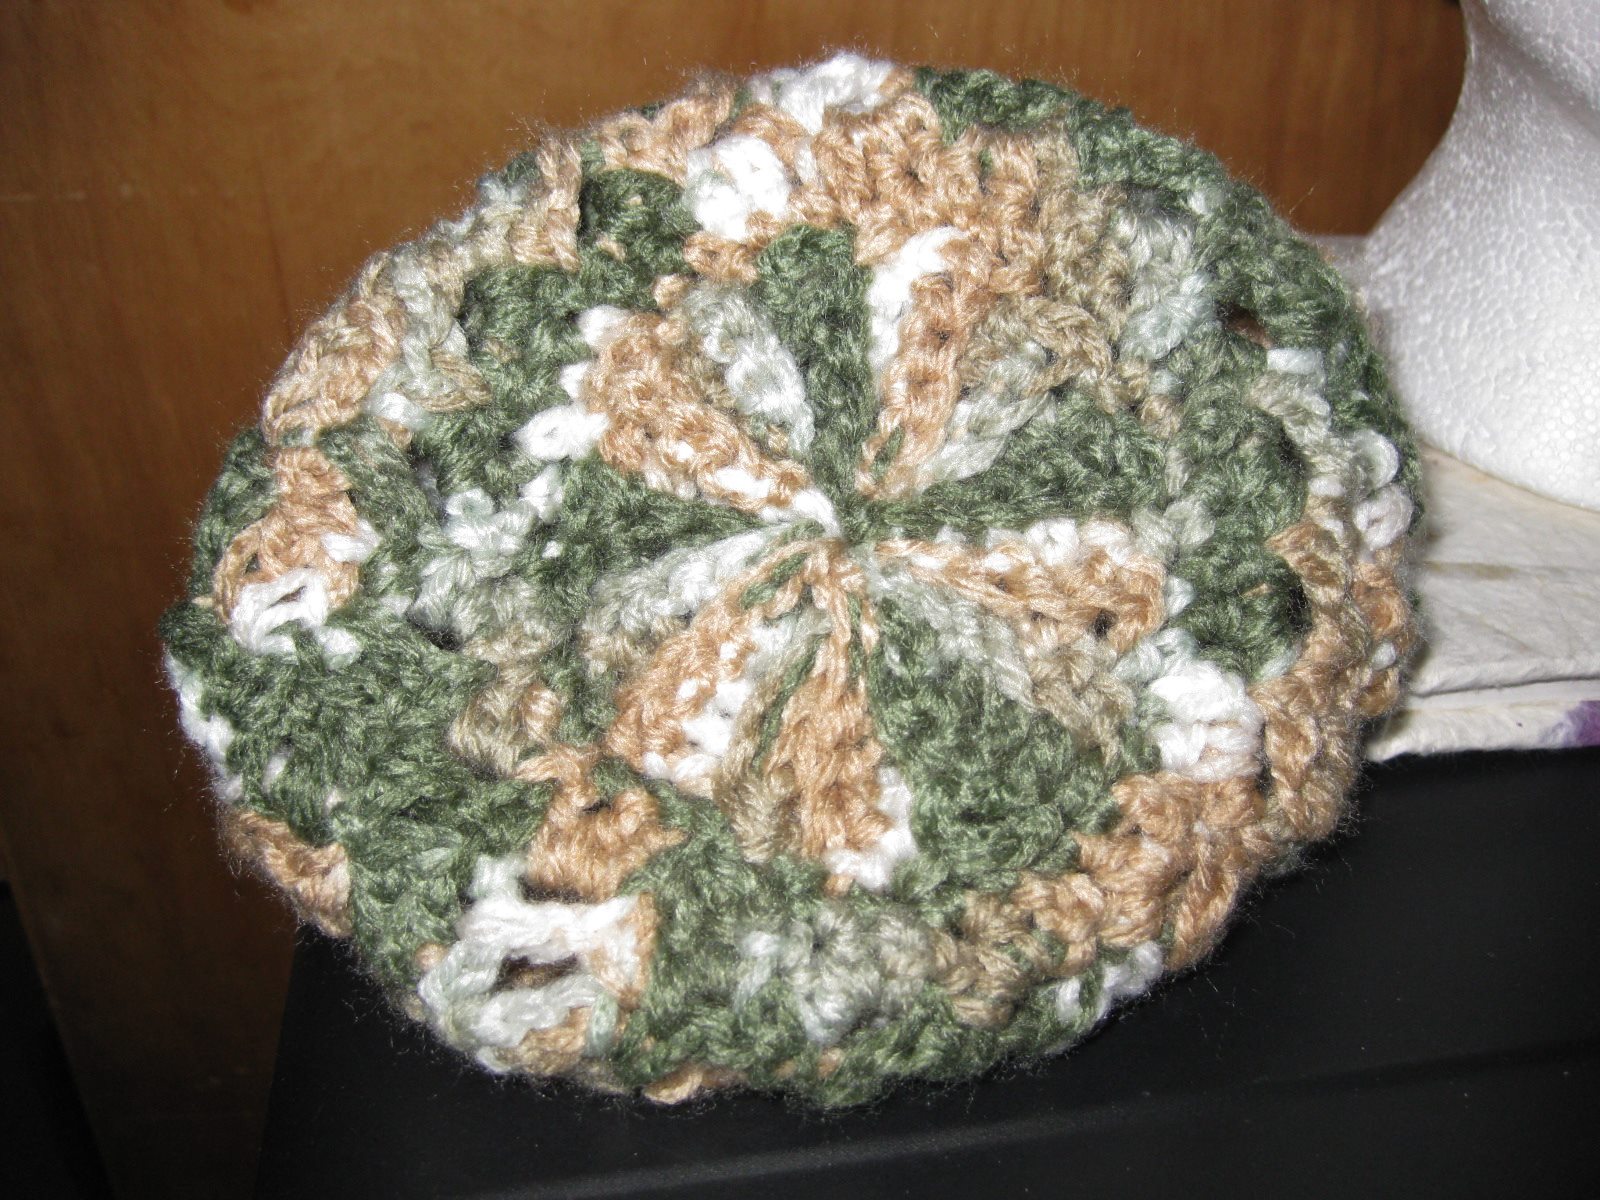


View of top of hat w/shrink rib.


Wednesday, March 27, 2013

Grow-able Hat Crochet Pattern


BOYS (& Girls) Reversible and Grow-able Hat


This is a Very Easy Pattern.
Worsted Wt Yarn.  I used Impeccable and then RedHeart and both worked.
Size J crochet Hook

I would say that this pattern fits a 4 or 5 year old and can grow into a 7 or 8 year old.  I have it on my little mannequin head and it fits well.  You could do the same pattern with a larger hook for a teen or adult and a smaller hook for a younger one.   My friend Pat tested this for me and made the girl's version.

The Right Side of the work is for the smaller size.


NOTE#1:  Adjust pattern in any way you wish.  I made one that had alternating rows of hdc/sc for the first 8 rows and it made the hat smaller and warmer on the top.  Feel free to post or use this pattern anywhere, even to selling the finished product.... except to claim it as your own.

Thanks.

INSTRUCTIONS:

Row 1:  (RIGHT SIDE OF WORK) ch 3, 6 sc in 2nd ch.  Join.  Pull yarn tight.

Row 2:  ch 2, 2 hdc in each sc around (14 hdc)

Row 3:  ch 2, *2 hdc in first hdc, 1 hdc in next hdc* around.  (21 hdc)

Row 4:  ch 2,  *2 hdc in first hdc, 1 hdc in each of next 2 hdc* around.
(28 hdc)

Row 5: ch 2,  *2 hdc in first hdc, 1 hdc in each of next 3 hdc* around.  (35 hdc)

Continue increasing each row, using hdc, until you have 49 sts.
(should be 2 more rows)

Row 8: ch 2, hdc around, increasing 3 sts evenly space so that you end up with 52 sts.

Row 9-19:  ch 2, hdc in each st around (52 sts)

Row 20:  TURN WORK:  ch 3, dc in back loop of each stitch around.
Join.

Row 21:  ch 2, dc in each st around (NOT back loop).  Join.
Fasten off.

NOTE#2:  You could also make this into a girls' hat by using "girly" colors and even adding a row after the two brim rows----:  ch 1, sc in first st,  skip 2 sts, 5 dc in next st, *skip 2 sts, sc in next st, skip 2 sts, 5 dc in next st*.  Repeat ** around.


This is now a reversible, growable hat...as soon as you tuck or weave in the ends.  Smile.    When you turn the hat inside out it "grows".

Thursday, December 29, 2011

Quick & Easy Lacy Shoulderette Less than 5 hours!

Corrections made January 16, 2012:   SECOND FRONT, Row 12:  Ch 3, skip st, V-st across DC IN LAST DC, Turn.  (4 V-sts)  
Row 1 of edgework:  TURN,  Ch 3, V-st in each st to last st, V-st around...etc.
Row 2:  Ch 3, V-st in each V-st around to last dc.  You can increase with an occasional lacy V-st to keep work flat.


I have been so down that I have not blogged so that I may not inflict myself on the world.  (somewhere in there is part of a quote from Mark Twain (I shall lie abed until noon so that I may not inflict myself on the world).  Anyway, I have been making prayer shawls for many years and I have yet to find one that is so quick and easy and lacy and pretty (she says unabashedly).
This pattern has not been tested because there is only me....I have made 3 of them and am on my fourth and they all came out the same...whethere this is my brain remembering or the pattern is right, I have yet to know.  Smile.


PRAYER SHOULDERETTE OR QUICK AND LACY SHAWLETTE (5 hours or less)
I got the idea for this shoulderette from a photo of Tammy Hildebrand’s for her BLUE SKIES JACKET (July 2008 CROCHET MAGAZINE.COM).  Thank you, Ms. Hildebrand.

Skill Level:  Towards Intermediate

Finished Measurement:  25” across back of shoulders;  middle of neck to bottom of back -= 15”;  From shoulder to front point = 16”

MATERIALS:  --For the green, I used #3 weight yarn (ends I had with no label), off-white is #4 worsted weight yarn (Wintuk 3.5 oz, 4 ply)  You need 2 skeins or approximately 8 oz.
--Hook size “M” (M/13-9.00) (I found metal was the quickest)
--lg-eyed needle to weave in ends

Gauge:  Not Important.  One Size Fits Most

Pattern Notes:        1)  ch-3 at beginning of row counts as first dc.
2)    Special Stitches:
V-ST = (dc, ch 1, dc) all in stitch indicated.
Lacy V-ST = (dc, ch 1, dc, ch 1, dc) in stitch indicated.
  3)  Ch 3 counts as dc throughout.

SHOULDERETTE  (I personally pray as I make these.  Sometimes for the person who will receive it and sometimes for myself to keep me close to God.  At times I pray for the world and Peace.  It makes me feel serene and useful – and closer to Heaven.  You of course don’t have to.  Just for me, since my oldest son died this past March 2011, I find great need of this.  And it is helping.)


BACK:  Chain 53.
Row 1:  Sc in 2nd chain from hook and in each chain across.  TURN. (52 sc)

Row 2:  Ch 3, sk next 2 sts, *V-st in next st, sk next 2 sts* across, end with dc in last stitch.  TURN EACH ROW IF I FORGET TO MENTION IT.  Smile.   (16 V-sts)

Row 3-14:  Ch 3, V-st in center of each V-st across, dc in last stitch, TURN  (16 V-sts)

Row 15:  Ch 3,  dc in 1st V-st, V-st in each V-st to last V st.  Dc in last V-st and Dc.
(14 V-sts)
Row 16:  Ch 3, Skip next dc, V-st across to last 2 dc, Dc in last Dc.  Fasten Off.

FIRST FRONT       Turn work so that starting chain is at the top and Right Side of sc row is facing you.

Row 1:    Attach yarn in 1st chain, ch 3, skip next 2 chains, *V-st in next chain, skip 2 chains* across until you have 7 V-sts, skip 2 chains, dc in next chain, TURN.
Row 2:    Ch 3, V-st in ea V-st across, dc in last dc.  (7 V-sts)

Row 3:    Repeat Row 2.

[decrease rows]  NOTE:  dec sts are made at side edge)
Row 4:    Ch 3, V-st across.  Do not work in last dc.  TURN

Row 5:    Slst into V-st, Ch 3, dc in same V-st, V-st across, dc in last dc.

Row 6:    Ch 3, V-st across to last dc & Ch 3, sk dc and dc in top of ch 3. TURN.

Row 7:    Ch 3, 2 dc in 1st V-st, V-st to end, dc in last st.  TURN.

Row 8:    Ch 3, V-st across to last 3 sts.  Dc in next dc, sk 1 dc, dc in last st.  TURN      (6 V-sts)

Row 9:    Ch 3, sk next dc, V-st across, dc in last dc.  TURN.  (5 V-sts)

Row 10:  Ch 3, V-st across 5 V-sts, skip last st.  TURN.

Row 11:  Slst into V-st, ch 3, dc in same V-st, V-st across, dc in last st.  TURN.   (4 V-sts)

Row 12:  Ch 3, V-st in 4 V-sts, skip next dc.  Dc in last st.  TURN.

Row 13:  Ch 3, 2 dc in 1st V-st.  V-st across, dc in last st.  TURN.  (3 V-sts)

Row 14:  Ch 3, V-st across to last 3 sts, dc in next st, skip 1 st, dc in last st.  TURN.

Row 15:  Ch 3, sk next st, V-st in each V-st, skip last st.  TURN.  (dc—3 V-sts—dc)

Row 16:  Repeat Row 11.  Fasten Off.

SECOND FRONT:  W/ starting ch at top and right side facing, skip 2 sts,  attach yarn,

Row 1:    ch 3, skip 2 ch, *V-st in next ch, sk 2 ch* across to last 3 chs.  Sk 2 chs, dc in last st.  (7 V-sts)  TURN.

Row 2-3: Ch 3, V-st in ea V-st across, dc in last st TURN.  (7 V-sts)

[decrease rows] 
Row 4:    Ch 3, 2 dc in 1st V-st, V-st across, dc in lst st.  TURN  (6 V-sts)

Row 5:    Ch 3, V-st across to last 3 sts, dc in next dc, sk next st, dc in last st.  TURN.  (6 V-sts)

Row 6:    Ch 3, sk next st, V-st across, dc in last st.  TURN (6 V-sts)

Row 7:    Ch 3, V-st across, skip last dc.  TURN  (6 V-sts)
Row 8:    Ch 3, dc in 1st V-st, V-st across, dc in last st TURN.  (5 V-sts)

Row 9:    Ch 3, V-st across to last 2 sts, skip st, dc in last st.  TURN.  (5 V-sts)

Row 10:  Ch 3, 2 dc in 1st V-st, V-st across, dc in last st.  TURN.

Row 11:  Ch 3, V-st across to last 3 sts, dc in next st, skip st, dc in last st.  TURN.  (4 V-sts)

Row 12:  Ch 3, skip st, V-st across, Dc in last dc.  TURN  (4 V-sts)

Row 13:  Ch 3, V-st across, skip last st.  TURN.  (4 V-sts)

Row 14:  Ch 3, dc in 1st V-st, V-st across, dc in last st.  TURN.

Row 15:  Ch 3, V-st to last 2 sts, skip st, dc in last st.  TURN  (3 V-sts)

Row 16:  Ch 3, V-st across, dc in last st.  (3 V-sts)  
DO NOT FASTEN OFF.
From this point on, you will be working around side edges of shoulderette)

Row 1:    TURN.  Ch 3, V-st in each st to last st, V-st around the ch 3 (corner), V-st in end of next 2 rows.  Continue to V-st in end of each row around to next corner.  You will place a Lacy V-st [dc, ch 1, dc, ch 1, dc] in ch3 just before corner at row end st.  --You are essentially V-st’ing around, end dc in last st (without working the neckline).  TURN.

Row 2:    Ch 3, V-st in each V-st around to last dc.   [NOTE:  add an occasional lacy V-st to ease fit.  TURN.

Row 3:    Ch 3, *V-st in 1st st, dc lacy V-st in next st* around to last st.  Turn work so you will b working around neck edge:
      
Working around ch 3, (last st of previous row) work Lacy V-st, work in ends of each row up to starting chain.   (alternating V-st, Lacy V-st still).
Sk 1 chain, Lacy V-st in next ch, sk 1 ch, V-st, Lacy V in ends of rows to starting chain of previous row.  Dc in base of Ch 3, Ch 1, slst in top of beginning ch 3.

FO.  Weave in ends.  Voila.   

Thursday, May 27, 2010

WONDERFULLY EASY BOOT SOCKS

Designed BY Linda Graimm, emmalemmon47@msn.com
**If you make the sock, please let me know if there were any errors.    Thank you.

Knit OR Crochet!! (Knitting directions with crocheted heel and toe are at the end of the pattern.)

This soft sock pattern is very adaptable. I made an adult pair and felted them, a change of hook size and/or yarn size could make a pair for a toddler. They work up SO quickly. I am the only one who has tested this pattern so, if you make them, please let me know if there are any problems or you have any questions.

MATERIALS: Worsted Weight yarn (I mostly used scraps so the socks don’t take a whole lot of yarn)
Size ‘I’ Hook = Women’s Size up to 8
Sized ‘G’ hook for toddler’s socks

GAUGE: Size ‘I’ hook = 14 hdc and 4 rows is 4”; ‘G’ Hook = 15 hdc/8 rows is 4”

NOTES:
1. The felted socks pictured were made with Patons Classic Wool and a Size ‘K’ hook (orange and gray).
2. The smaller knitted socks were made with doubled sock yarn.
3. Be sure to do original chain LOOSELY.
4. There is NO SEAM on bottom of foot so no discomfort from that.
5. Chain 2 does NOT count as stitch.
6. ALL BODY STITCHES ARE DONE IN BACK LOOP ONLY.
7. I wrote the pattern in Sections, as opposed to rows. It is easier to read (according to me tic).

Section 1: Chain 40 (loosely!), work hdc in 3rd chain from hook, and hdc across chain. Turn, chain 2 each row. (38 hdc)

Row 2-5: Working in back loops only, hdc across, chain 2, turn.  (38 stitches)

Section 2: Row 6: Work first 23 hdc, turn, chain 2. Leave remaining 15 stitches for now. Chain 2, turn. (23 hdc)

Row 7-11: Working in back loops only, hdc across, chain 2, turn. (23 hdc) Mark last stitch with scrap yarn or stitch marker. Fasten off.

Section 3: Attach yarn in same stitch as last stitch of 23 sts on Row 4 (where 23 worked sts ended), --Chain 2, work 1 hdc in back loop of next stitch and back loops of 14 more hdc. --Then Chain 2, turn (15 hdc), work 15 hdc in back loops for 5 more rows. (thus matching the first 6 rows of 23 sts). (15 sts) Fasten off.

Section 4: Turn Work. (See Photo B.) Attach yarn in marked stitch on 23-sts section, chain 2. Hdc (in back loop only) in this stitch and each stitch across 23 sts and 15 sts. (38 sts)

Note: I am calling the stitch that is between the 15-st section and the 23-st section a “Hinge” to make explanations easier.

Work four more rows in pattern (Ch 2, turn, hdc in back loops only across row). (you will have 8 “ridges” on the Right Side and 8 indentations on Wrong Side.) (38 sts)

Section 5: Chain 1, turn work and with 8 ridges on inside, slip stitch last row to original chain LOOSELY. This is wrong side of work. Fasten off. Turn sock Right Side out.

You now have what resembles a tube with a slash in it.

Section 6: TOE Attach choice of yarn color for the Toe anywhere on short end of sock nearest heel ‘slash’ (the 15-hdc side), I attached yarn lined up with the middle of what will be the heel.

--Ch 1, work 26 sc evenly spaced around toe opening. Join in 1st sc. Do NOT turn work, you will be working in rounds.
Row 2: Chain 1, sc in each st around, join. (26 sc)

Row 3-8: Flatten work with heel ‘slashes’ on side, Chain 1, decrease one stitch each side, join. (24, 22, 20, 18, 16, 14 sc)


Fasten off, leave long end for sewing. ON WRONG SIDE OF WORK, Flatten toe section so that heel slash is centered, sew seam. Check out Photo C.

Part 7: HEEL From Right Side, attach your choice of yarn color in end of first row just after “hinge” of heel slash. Work 26 sc evenly spaced around, join. (26sc)

Row 2: Chain 1, work 1 row of sc even, join. (26 sc)

Row 3: Slip stitch in first st, ch 1, sc around, placing a 3-sc decrease on each side (to 3-sc dec: pick up a loop in each of next 3 sts, pull through 4 loops) and join. (22 sc)

Row 4: Slip stitch in first st, ch 1, *sc in each of 4 sc, dec over net 2 sc* around to last 4 sc, sc in last 4, join. (19 sts)

Row 5: Ch 1, repeat Row 4 with only one last sc, crochet in last sc, join. (16 sts)

Row 6: Ch 1, *sc in 3 sts, decrease over next 2 sts* around, join (12 sts)

Row 7: Ch 1, *sc 2 sts together, sc in 1 st* around, sc in last st, join. (9 sts)

Row 8: Repeat Row 7. (5 sts)

Fasten off, leave a long end of yarn for sewing heel closed.
Flatten stitches and sew heel closed from Wrong Side. Weave in ends. 

KNITTING DIRECTIONS:
Size 10 knitting needles with worsted wt. yarn (The darker blue-variegated sockon the Left in the picture is knitted.)

--Follow directions above, substitute K2,P2 rib for Parts 1-5.

Ex: Cast on 40 sts, work in K2/P2 ribbing for needed amount of rows. Slip stitches not being worked to a stitch holder. Follow directions for crocheted heel and toe.

Sunday, February 14, 2010

Toddler's Swing Pinafore

Toddler’s ‘Swing’ Pinafore—An old-fashioned pinafore!
Designed by Linda Graimm
NOTE:  This pattern is in the process of being tested.  If you make one, please let me know how you did.  Thanks.

emmalemmon47@yahoo.com
I loved making the Butterfly Pinafore (MCCALL’S CROCHET TREASURY, Copyright 1968 etal, Simon & Schuster Publishing Company) but wanted it to be sized for an older girl and more “swingy.” This is the result.

Size: with K hook = 23[26]” waist, 16[17-1/2]” from shoulder to hem. I gave the pinafores to girls. The 23” waist fit a moderate sized 3-yr old, and the 26” waist fit a moderate 4-5 year old, in my experience.
--Larger size is in []

Gauge: with K hook; in dc patt, 11 sts and 5 rows = 4”

1. Shell St varies (gains more stitchess as you work) so the gauge on the skirt shells will vary.
2. Length is very adjustable.
3. Turn each row.
4. If you use #3 weight yarn for edging, be sure to put 3 sc in the side of each row as opposed to alternating 2 sts/3sts each row.
5. You may add or subtract as many rows as you need for your desired end. (nifty “new wave” if you make it shorter so it could become the layered look, and very special girl’s longer model if you add more rows…Flower Girl’s Pinafore? Over a beautiful slip/dress it would look wonderful, I think, possibly with #3 weight yarn?)

Materials: I used leftover worsted weight stash; ‘K’ crochet hook
{Because this was older yarn—before my more organized days—I didn’t save the yarn info, so I am guestimating here….For smaller pinafore, Caron & Glow-in-the-Dark yarn was used; larger size made from pink camo yarn with an acrylic/mohair blend #3 weight yarn}
(Stripes of color in the Pinafore pattern were added either as a result of yarn running out OR randomly, as in the large pinafore}

Starting at Yoke neck edge, chain 52[56].
Row 1: Dc in 4th chain from hook and in each of next 4[6] ch (back); 3 dc (3-dc group) in next chain, dc in each of next 11 ch (sleeve), 3 dc in next chain, dc in each of next 12[14] chain (front), 3 dc in next chain, dc in each of next 11 ch (sleeve), 3 dc in next stitch, dc in each of next 6[7] ch (back) – 58[62] dc (counting ch 3 as 1 dc).
NOTE: Turn each row.

Row 2: Ch 3, skip first dc, dc to center of first 3-dc group, place 3 dc in the center stitch; *dc in each dc across to center of next 3-dc group, 3 dc in the center stitch* to end. –8 dc inc. 66[70] dc

Row 3: Repeat Row 2. 66[70] dc

Row 4: Ch 3, sk first dc, dc in each stitch to center of ch-3 group, 3 dc in next dc, (sk one dc, 3 dc in next dc) 8 times (start of sleeve ruffle), sk next dc, 3 dc in next dc, dc in each st to center of ch-3 group, place 3 dc in center stitch, sk next dc repeat between ( ), sk next dc, dc in each stitch to top of turning ch, dc in turning ch.

Row 5: Ch 3, sk first dc, dc in each stitch to center of 3-dc group, 3 dc in center stitch, sk next dc (5-dc shell in center st of each 3-dc shell in previous row) {8 shells), sk next dc, 3 dc in center of ch-3 group, dc in each stitch to center of next 3-dc group, 3 dc in center stitch, sk next dc, repeat ( ) earlier, sk next dc, dc in each stitch to end, dc in turning ch.

Row 6: Ch 3, sk first dc, dc in each stitch to center of 3-ch group, 3 dc in next dc, ch 2[3], sk sleeve ruffle, 3 dc in center dc of next ch-3 group, dc in each stitch to center of ch-3 group, 3 dc in center stitch, ch [3], skip sleeve ruffle, place 3 dc in center of next 3-dc group, dc in each stitch to end, dc in top of ch 3 from previous row.

Row 7: Ch 3, 2 dc in same stitch as joining, 3 dc in next stitch, *skip next stitch, place 3 dc in next stitch* around, up to and including ch 3 at end.

Row 8: Ch 3, 2 dc in same stitch as joining, 3 dc in center stitch of each 3-dc group around, ending 3 dc in top of turning ch.

Row 9: Ch 3, 2 dc in same stitch as joining, 4 dc in center of each 3-dc group around, ending 3 dc in top of turning ch.

Row 10: Ch 3, 2 dc in same stitch as joining, *place 4 dc between center 2 stitches of previous 4-dc group* across, 3 dc in top of turning chain.

Row 11: Ch 3, 2 dc in same stitch as joining, 5 dc (shell) between center stitches of 4-dc group, around, ending 3 dc in top of turning ch.

Row 12: Ch 3, 2 dc in same stitch as joining, 5 dc (shell) in center stitch of each shell around, ending 3 dc in top of turning ch.

Row 13-15 [13-16]: Repeat Row 12.

Shoulder Ruffle Finishing, if desired: Crochet row of sc around the sleeve, placing 3 sc in center stitch of each shell.

Edging:  {If you use #3 weight yarn for edging, be sure to put 3 sc in the side of each row as opposed to alternating each row.}
Starting at Left Side Back, Ch 30, 1 sc in edge of Row 6, place 2 sc in side of Row 5, 3 sc in side of Row 6, alternating (2 sc, 3 sc) up to corner at neck edge of Left Side of Pinafore; ch 30, slip stitch back down ch, place one sc in corner stitch, turn work so that you are working along neck edge.

--1 sc in each dc to Right Side Corner of neck edge, place 1 sc in corner, ch 30, slip stitch back down ch, place another sc in corner.
--Work down Right Side Edge of Back, alternating (2 sc, 3 sc) in side of each row until you reach Row 6, place 1 sc in side of Row 6, ch 30, slip stitch back down ch, place 2 sc in side of Row 6. Ties made.
--alternating (2 sc, 3 sc) in sides of rows, work to lower edge, place 3 sc in corner.
--Sc across bottom of Pinafore, placing 3 sc in center stitch of each shell to next corner.
--alternating (2 sc, 3 sc) in sides of rows, work to Row 6 where you started, slip stitch in beginning ch to end.
--Fasten Off. Weave in ends.
By all means, contact me if you have any problems with this pattern: emmalemmon47@yahoo.com